INTRODUCTION
“Please help! I recently installed O365 Home Premium and need to move Outlook 2010 PST data to Office 365 account. How can I perform this? Because I already searched over the internet about this, but I did not find any relevant solution for the same. Can any technical blogger tell me how to upload PST file from Outlook 2010 to O365 webmail? It’s urgent!”.
If you are facing the same situation and looking for a solution, then must read this article once.
There are various situations due to which users need to move Outlook PST data into Office 365 online. However, the lack of relevant methods makes users unable to transfer Outlook 2010 local data file into O365 account by own. So, in this technical post, we will explain some mind-boggling techniques that can migrate .pst file data to Office 365 mailbox in a seamless manner.
Manual Approach to Move Outlook 2010 PST File to Office 365 Webmail
In such a situation when a user has only a few numbers of PST files, then they can prefer this workaround. In this method, Outlook inbuilt function named as Import/Export wizard will be used. It is a free way to upload .pst file into O365 account
However, this method includes a long sequence of steps that make it time-consuming. So, always make sure that you have an appropriate amount of time to execute this procedure. Here, we mentioned the complete step-by-step guide to move Outlook 2010 PST file to Office 365. Just execute the instructions sequentially without skipping any step.
- Initially, open your Microsoft Outlook 2010 application on Windows system.
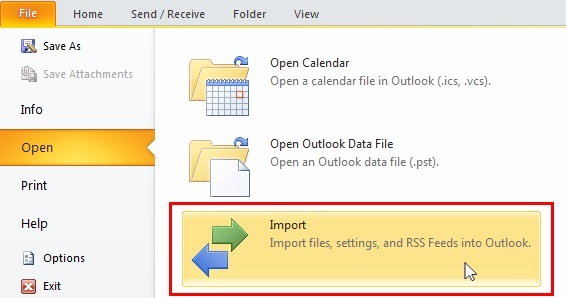
- Once it is opened, click on File >> Open >> Import option.

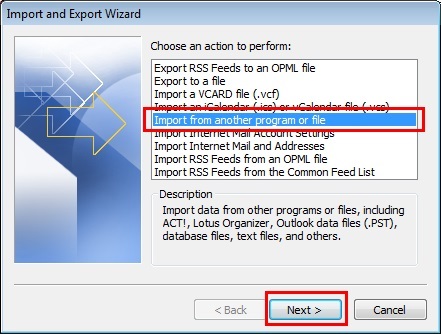
- In Import and Export Wizard, select Import from another program or file option under the Choose an action to perform section. Then, click on Next for further process.

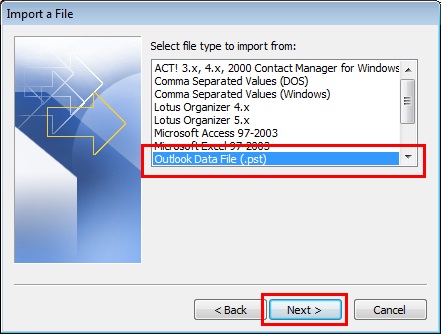
- In the following window, locate and choose Outlook Data File (.pst) and click on Next.

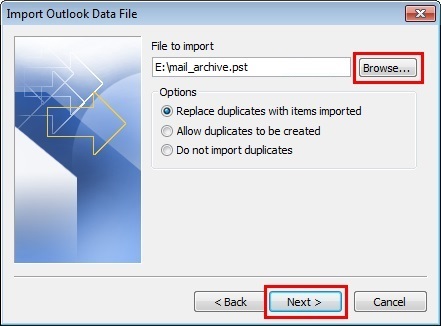
- From Import Outlook Data File, click on Browse button to locate the Outlook data file. Once you have selected the file, select any of the following options as per convenience and hit Next button.
- Replace duplicates with items imported.
- Allow duplicated to be created.
- Do not import duplicated.

- In such a situation when you want to import all the data, then just select the root folder. Afterward, check the box labeled as Include subfolder. Otherwise, you can only select mail folder that you wish to move in O365. Also, select the Import items into the same folder in radio button. Then, press the Finish button.

- The data migration will take some time. Once the process gets completed, all the Outlook PST data will appear under Office 365 account
Is It Secure to Use Manual Method for Outlook 2010 PST to O365 Migration?
It is important for users to aware of all the downsides of Import and Export Wizard before using the method. The above-described solution is great to transfer one or two .pst files into O365 mailbox. But when the number of Outlook data files extend this limit, Import and Export Wizard behaves abnormally and generates various problem in migration process. Here, we described some of its limitations.
- It is not an appropriate way to transfer bulk Outlook data file into Microsoft Office 365 account
- Outlook program is required to execute this procedure. Because Import and Export Wizard cannot be downloaded independently, it comes under the Outlook application.
- If the PST file is oversized, then it will definitely generate some issues during import process. So, it is suggested to split the PST file in multiple small files before transferring into O365 account.
- Multiple Outlook data files cannot be moved in Outlook 365 mailbox in one go
Does Any Alternate Solution of Manual Approach Available?
It is clear from above that manual workaround is not an ideal way to move Outlook 2010 PST data to Office 365. Hence, it is better to use Office 365 Import Tool instead of Import/Export Wizard.
Office 365 PST Import Software is an outstanding automated solution that allows the migration of multiple .pst files to Office 365 account in the minimum time span. Additionally, it keeps the folder structure intact throughout the import process. Users can easily upload multiple PST file in Outlook 365 account in one go.
Apart from this, the utility provides a filter feature to migrate only selective emails, calendar entries, and tasks in O365 online. Moreover, the software supports majorly all the subscription plans of Office 365, including Office 365 Enterprise E1, E3, and E5. Hence, it is the best alternative to upload Outlook data file in O365 webmail.
Quick and Easy Steps to Migrate Outlook 2010 Data to Office 365
Step 1. Download and launch the software on your computer. Choose Outlook and Office 365 as the source and destination platforms.

Step 2. From the workload selection screen, enable all the required mailbox categories that you want to migrate from Outlook 2010 data files to the Office 365 platform.

Step 3. Apply the built-in Date-Range filter to migrate data selectively for a particular date range. Click Next.

Step 4. Go to the Source tab. Set the destination folder path containing the Outlook files. Arrange each file with the names of respective user accounts as shown below:
Create folders in the root drive, such as E:/PST/user1@abc.com/ (for user1’s files)
- E:/PST/user2@abc.com/ (for user2’s files)
- E:/PST/user3@abc.com/ (for user3’s files)
Continue this pattern for each user, placing their local files in their respective folders. Select the folder “E:/PST/” as the Import Folder Path in our tool.

Step 5. Validate required permissions by clicking on the validate button. Click on the Next button.

Step 6. In the destination tab, you have to enter the admin credentials of the destination Office 365 tenant. Click on the validate button to validate the permissions accordingly. Click on Next to proceed.

Step 7. Moving to the user's tab, choose the desired method for adding users from the source tenant:
- Fetch Users – Automatically fetches users from the source tenant.
- Import Users – This allows you to Import users via a sample CSV file.
- Download Template – Provide you with a sample CSV file template for user mapping creation.
Choose the appropriate method for adding users.

Step 8. Select user accounts to migrate Outlook 2010 PST data to Office 365. Click on the validate button. Lastly, click on the start import button.


